

10 Reasons Black Forest Cheesecake Should Be Your Dream Baking Project
Table of Contents
Can You Resist the Ultimate Chocolate Dessert?
What’s better than a dessert that combines rich chocolate, tangy cherries, and creamy cheesecake all in one slice? If you’ve ever wondered how to create a show-stopping dessert without spending hours in the kitchen, Black Forest Cheesecake is your answer 8. This decadent treat takes the classic flavors of Black Forest cake and transforms them into a cheesecake masterpiece. Whether you’re a seasoned baker or just starting out, this recipe will leave you craving more. Let’s dive into why this cheesecake should top your baking list—and how to make it yourself!
Why Black Forest Cheesecake is Worth the Effort
This recipe is special because it brings together two beloved desserts: Black Forest cake and cheesecake. The result is a rich, indulgent dessert that’s perfect for any occasion—from birthdays to casual weekend treats.
- Time Requirement : Depending on the variation, you can choose between a no-bake version (ready in under 2 hours) or a baked version (requiring about 3 hours, including cooling time).
- Difficulty Level : Easy to moderate. Even beginners can master this recipe with a little patience and attention to detail 5.
- Special Features : It’s creamy, chocolatey, and topped with juicy cherries—a flavor combination that’s hard to beat. Plus, it’s versatile enough to suit both simple gatherings and fancy dinner parties.
So, what makes this cheesecake stand out? Let’s explore its key ingredients and preparation steps.
Essential Ingredients: The Building Blocks of Flavor
Here’s what you’ll need to create this mouthwatering dessert:
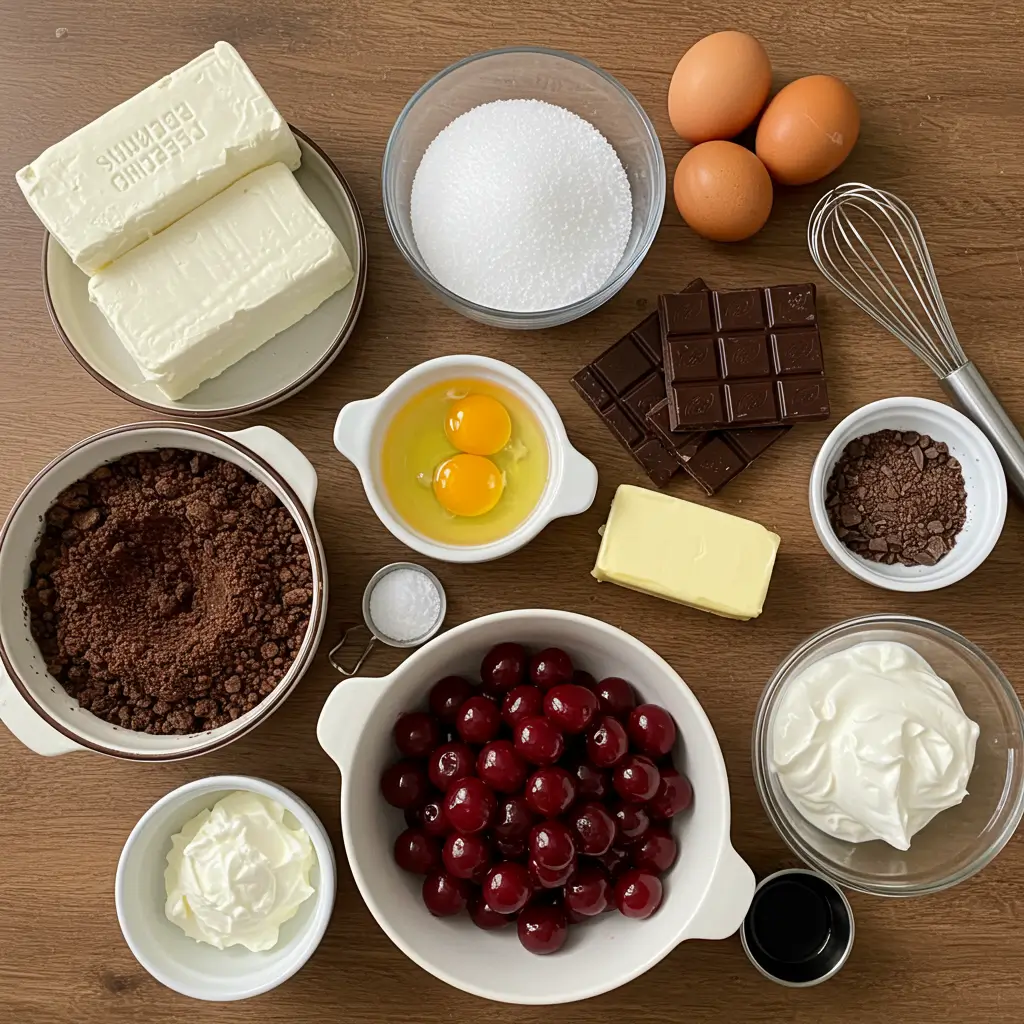
- Chocolate : Dark chocolate is ideal for a rich, intense flavor. Semi-sweet chocolate chips work well too if you prefer a sweeter taste .
- Cheesecake Base : Cream cheese is the star here, providing a smooth, tangy base. You can also add ricotta for extra creaminess .
- Crust : Crushed Oreos or graham crackers mixed with melted butter create a sturdy yet crumbly foundation. For a gluten-free option, use gluten-free cookies or nuts like almonds.
- Cherries : Jarred cherry pie filling is convenient, but fresh cherries cooked with sugar and a splash of cherry syrup elevate the dish .
- Whipped Cream : A dollop of homemade whipped cream adds lightness and balances the richness of the cheesecake.
- Optional Add-ins : Vanilla extract, cocoa powder, or almond extract enhance the flavors.
Substitutions and Variations :
- Swap dark chocolate for milk chocolate if you prefer a milder taste.
- Use strawberry or raspberry toppings instead of cherries for a fruity twist.
- For a vegan version, substitute cream cheese with cashew-based alternatives and use coconut whipped cream 9.
Step-by-Step Instructions: From Prep to Perfection
Let’s break down the process into manageable steps:
- Prepare the Crust :
- Crush your chosen cookies (Oreos or graham crackers) in a food processor or by hand using a ziplock bag and rolling pin.
- Mix the crumbs with melted butter until the mixture resembles wet sand. Press it firmly into the bottom of a springform pan to form an even layer. Chill while you prepare the filling.
- Make the Filling :
- Beat softened cream cheese, sugar, and vanilla extract until smooth and creamy.
- Melt dark chocolate and fold it gently into the cream cheese mixture. For a no-bake version, simply chill the batter before assembling. For a baked cheesecake, bake at a low temperature (around 160°C/325°F) for 45-50 minutes, then let it cool completely 7.
- Add the Cherry Topping :
- Heat jarred cherry pie filling in a saucepan over low heat, adding a splash of cherry syrup for extra sweetness. Alternatively, simmer fresh pitted cherries with sugar and water until they soften. Cool before spreading over the cheesecake.
- Finish with Whipped Cream :
- Whip heavy cream with powdered sugar and vanilla extract until stiff peaks form. Pipe or spread it decoratively around the edges of the cheesecake for a professional touch.
- Chill and Set :
- Refrigerate the assembled cheesecake for at least 4 hours—or overnight—for the flavors to meld and the texture to firm up.
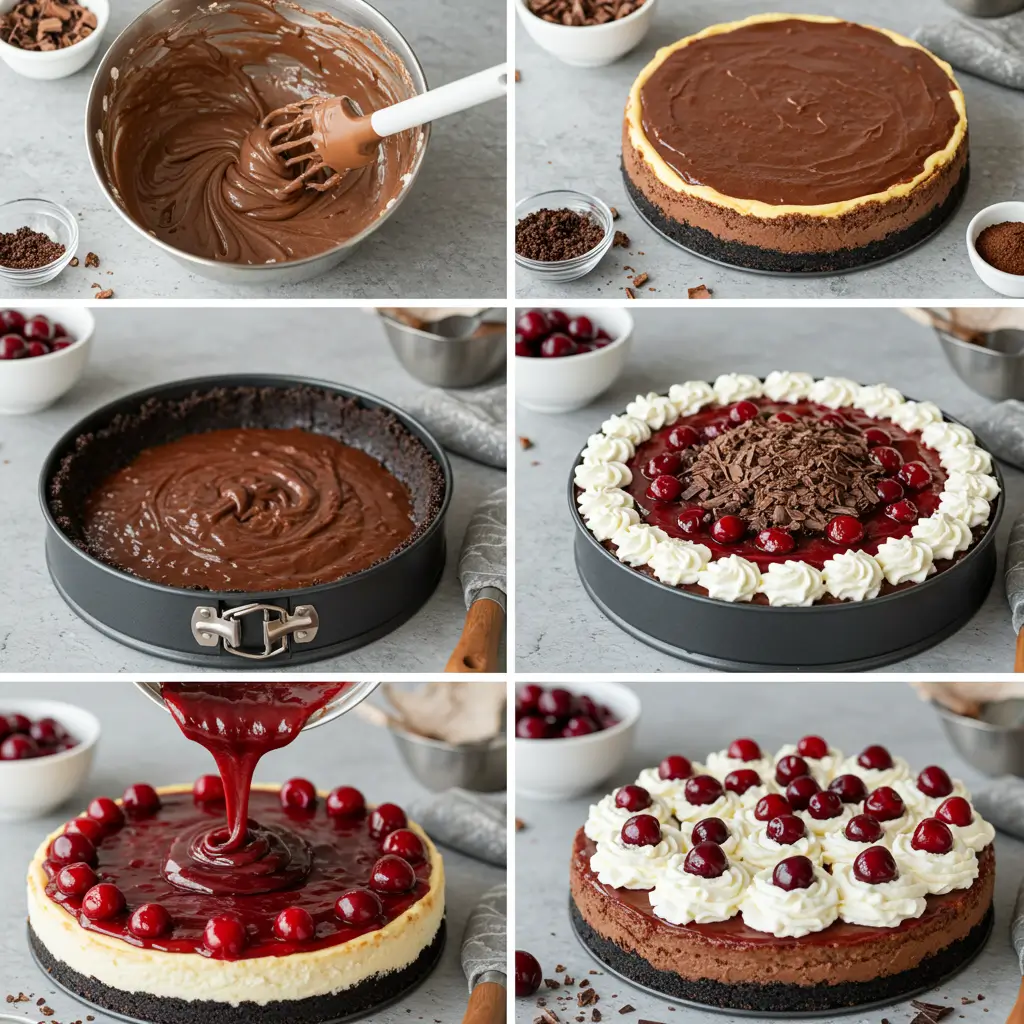
Assembly: Building Your Masterpiece
Assembling this cheesecake is where creativity shines. Start by spreading the cooled chocolate cheesecake filling evenly over the crust. Next, layer the cherry topping in the center, leaving some space around the edges for visual appeal. Finally, garnish with piped whipped cream and a few whole cherries or chocolate shavings for elegance.
Presentation Tips :
- Use a piping bag fitted with a star tip to create decorative borders.
- Dust the plate with cocoa powder or grated chocolate for added flair 8.
- Serve slices on small dessert plates with a drizzle of chocolate sauce for an extra wow factor.
Storage and Make-Ahead Tips: Keep It Fresh
One of the best things about Black Forest Cheesecake is that it stores beautifully. Here’s how to keep it fresh:
- Refrigeration : Store leftovers in an airtight container in the fridge for up to 5 days. Cover loosely with plastic wrap to prevent the whipped cream from getting soggy.
- Freezing : Wrap individual slices tightly in plastic wrap and freeze for up to 2 months. Thaw in the fridge overnight before serving.
- Make-Ahead Option : Assemble the cheesecake up to 2 days ahead of time and refrigerate. Add the whipped cream and final decorations just before serving 1.
Recipe Variations: Get Creative!
Don’t be afraid to experiment with different combinations:
- Nutty Twist : Add chopped toasted hazelnuts or almonds to the crust for extra crunch.
- Layered Look : Alternate layers of chocolate and vanilla cheesecake batters for a marbled effect.
- Mini Cheesecakes : Use cupcake liners and mini pans for bite-sized versions—perfect for parties.
- No-Bake Version : Skip the oven entirely and chill the cheesecake to set 2.
These variations allow you to tailor the recipe to your tastes or dietary needs while keeping the essence of Black Forest cheesecake intact.
Conclusion: Time to Get Baking!
There you have it—ten compelling reasons why Black Forest Cheesecake deserves a spot on your baking list. With its irresistible blend of chocolate, cherries, and creamy cheesecake, this dessert is sure to impress anyone who tries it. Whether you’re celebrating a special occasion or simply treating yourself, this recipe promises satisfaction in every bite. So grab your ingredients, roll up your sleeves, and enjoy the magic of baking this decadent delight.
FAQs: Answering Your Burning Questions
Q: Is Black Forest Cheesecake difficult to make?
A: Not at all! With clear instructions and simple techniques, even beginners can achieve great results 8.
Q: Can I make this cheesecake ahead of time?
A: Absolutely! You can assemble it up to 2 days in advance and store it in the fridge. Just add the whipped cream before serving 1.
Q: Are there healthier options for this recipe?
A: Yes! Use reduced-fat cream cheese, Greek yogurt, or plant-based alternatives to lighten the calorie load. Opt for fresh cherries instead of canned for less sugar 9.
Q: How do I prevent cracks in my cheesecake?
A: Bake it in a water bath to ensure gentle, even cooking. Avoid overmixing the batter, as air bubbles can cause cracks during baking 7.
Now that you know all the secrets to mastering Black Forest Cheesecake , it’s time to unleash your inner baker. Happy baking!
What are some other unique cheesecake flavors I can try at home?
How do I troubleshoot common issues when baking cheesecakes?
Can you suggest more dessert recipes that combine chocolate and fruit like the Black Forest Cheesecake?
Did you love it ? Let us know!
There are no reviews yet. Be the first one to write one.